angle-graphic

Filter Project Activity by Date – Customer Appreciation Summer Week 3

This week’s release in our Customer Appreciation Summer I’m personally excited about, as it makes the Project Activity page a lot more useful – you can now filter by date range! As part of that, we have also changed how the activity page works so that it no longer requires you to navigate day-by-day.

Filtering activity to a date range

Previously the project activity page could only show one day’s activity at a time. This approach made it tedious to use the activity page to answer common questions like “When did this user last make changes?” and even “What’s happened recently?”.

Now Project Activity works more like a newsfeed, showing you the most recent activity regardless of when that activity occurred. You can page through activity to see older actions. Using the new Date filter, you can filter activity to specific time periods. Combine date filtering with the other filters to answer detailed questions such as “What issue comments did this user create last month?”.

We hope you like it. See you next week!

Phone Numbers – Customer Appreciation Summer Week 2

This week’s release for Customer Appreciation Summer is a simple but useful improvement: we’ve added a phone number field throughout the application. Technically this field was always there (you could set it on your profile page) but we didn’t show it in many places.

The “Phone Number” field is now available when adding users

The phone number field is now available where you would expect:

  • When adding a new user to a project or account
  • When viewing a user in a project or account
  • When editing a user in a project or account
  • When exporting account or project users
  • When adding a person to a Meeting distribution list
  • When viewing a Meeting distribution list
  • When exporting or PDF’ing a Meeting distribution list

As a bonus, we also updated the date for Meetings to include the year. A tiny feature but highly requested!

The year: small but important

See you next week!

A New Feature Every Week – Customer Appreciation Summer

The 3rd Annual Customer Appreciation Summer starts this week! Just like in past years, we’ll be releasing new features all summer long. In fact, we will be releasing one new feature every week for twelve weeks. That’s twelve new features in three months. Perhaps more importantly, these features have been sourced entirely from customer requests and include some of our most requested features.

Many of these features are the relatively small improvements that make the day-to-day experience of using the software more pleasant. Don’t worry, though – there’s a few bigger ones in there, too. Here’s just a few of the features that will be coming:

  • Deleting projects
  • Attaching files to progress reports
  • Showing users’ role and company next to their comments.

The First Weekly Feature – Editing Names and Titles

We are kicking off with one of the more highly requested features, available today – the ability to edit a user’s name after you have invited them. Now any time prior to the user accepting your invite you’ll be able to edit their name to correct any misspellings or other issues you discover. While we were doing this we also added an optional “Title” field to a user’s profile which will be shown if set.

More To Come

When a customer makes the decision to use CxAlloy TQ they are not only investing in the CxAlloy TQ of today but also what it will be in the future. We hope we are living up to that investment and are grateful for your trust and confidence in us. See you next week!

Capture Equipment Data without Typing a Single Letter

Today we have an incredible new feature for you – the ability to scan equipment labels and record equipment data, without typing a single character. Simply take a photo of equipment labels with your iPhone or iPad camera, then tap the recognized text to record instant, accurate data.

The feature may not always work perfectly, so we have initially released it as an “Experimental Feature”. To enable it, go to the Projects screen in the app, then tap the gear icon ⚙, then Advanced, then toggle on Experimental Features.

Once enabled you’ll see a new Label button at the top right when answering a checklist or test line with a linked attribute. There will also be a new Tag button in the search field that will let you quickly scan a nameplate or label for an equipment tag. We’ve prepared a short video that shows you how these features work.

https://cxalloy.wistia.com/medias/empma7kuay?embedType=async&seo=false&videoFoam=true&videoWidth=640

More Powerful Import Tools for CxAlloy TQ

In our February 2020 release of CxAlloy TQ we made four key additions to the import capabilities of CxAlloy TQ. You can now:

  • Import issue and equipment status.
  • Import issue assignment and asset.
  • Import multiple systems for equipment and multiple zones for spaces.
  • Import areas served for equipment.

Status Importing

When importing equipment or issues you can now import status. Statuses have some unique considerations, including restricted and locked statuses, which we have been careful to address.

The import will automatically handle restricted statuses to prevent a user from setting statuses they are not authorized to set. For example, if you are trying to import issues with the status “Closed” and you don’t have permission to set the “Closed” status, the import will prompt you to select a different status to use in place of “Closed”.

Similarly, when updating existing issues or equipment you may not be authorized to change the status of certain items at all (see the status locking blog post for more). The import will automatically ignore status changes on those items and will notify you in the results page if any status changes were ignored.

Unlike some other fields, it is not possible to create new statuses through an import.

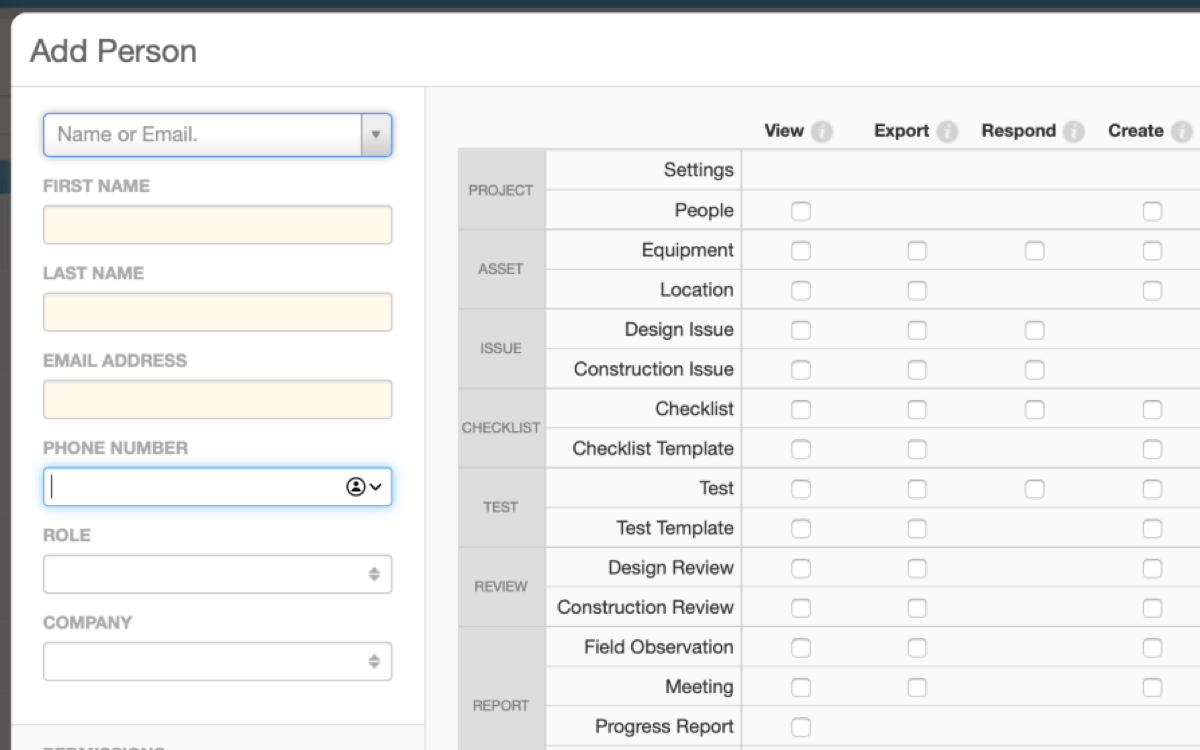
“Multi-Field” Fields – Asset and Assigned To

Issues in CxAlloy TQ have the fields “Asset” and “Assigned To” which can reference one of several types of items. This is different from most fields. For example, an issue’s asset could be a space, zone, floor, building, system, equipment type, or piece of equipment. Previously you couldn’t import into these “multi-field” fields, but now you can.

Unlike other fields, it is not possible to create new values during the import for these “multi-field” fields. For example, you cannot create new people, companies, or roles for the “Assigned To” field when importing issues. You must either select one of the existing options or leave it blank.

Multiple Value Fields – System and Zone

Previously it was impossible to specify multiple systems for a piece of equipment or multiple zones for a space. Now, it is possible to import multiple systems for equipment and multiple zones for spaces.

To do so, you separate your systems or zones by a custom delimiter: a space, a pipe, then a space ( | ). For example, to have a single piece of equipment belong to both the “HVAC” and “Chilled Water Loop” systems you would put “HVAC | Chilled Water Loop” as the system value in your spreadsheet.

CxAlloy TQ uses the same delimiter when exporting, so you can round-trip (export then import) equipment or spaces and all the systems or zones will be maintained.

As part of this feature we have changed how importing systems and zones into existing items works. Previously whatever system or zone you supplied would get added as an additional system or zone for the item. Now, the set of systems or zones (even if only one) in your spreadsheet replaces any existing systems or zones for that item.

Putting It Together: Area Served

I’m really happy that we can now offer the ability to import “Area Served” values for equipment. Area Served was challenging because it is both “multi-field” (it can be a space, floor, zone, or building) and multi-value, as one equipment can serve many areas.

With the additions we have made it is now possible to import Area Served. To specify multiple values, separate them by the space-pipe-space ( | ) delimiter. The import will automatically match the values against existing spaces, floors, zones, and buildings and suggest the closest match it can find. Please keep in mind that just like our other “multi-field” fields, you can only select from existing values for Area Served, and like our other multiple value fields, whatever you specify for Area Served will fully replace any existing served areas.

Whew! That’s a lot. We hope you like the improvements we’ve made. Please let us know any questions you have at support@cxalloy.com and give us suggestions for future improvements at feedback.cxalloy.com.

More Flexible Reports in CxAlloy TQ

As part of our February 2020 release we greatly expanded the filtering options in the report generator. Each section (issues, checklists, tests, etc.) now includes all or most of the same filters as that section’s list view. Even better, you can select multiple options for each of these filters, just like you can on the list page.

A full list of the filtering options for each section is included at the end of this post. Note that the Building filter is available for any section where it makes sense – one of the common requests we get is to better enable building-level reporting. The addition of these filters should make it easier than ever to report on a building-by-building basis.

Besides building reporting it’s also easier to do system-level reporting. The “System” filter for equipment along with the “Asset” filter for issues, checklists, and tests enables you to build a report specific to one or several systems on the project.

Table of Contents for a report broken down by system

Keep in mind that the same section can be added multiple times, with different filter options each time. In this way you could have a single report that was divided between systems, buildings, or other criteria. As an example, I could create a report that includes all issues, checklists, tests, and equipment for a system with a custom title page in front of it, then repeat that for each system.

Report configuration showing per-system filtering

With the addition of multiple report configurations this is really powerful.

Available Filters

Issues

  • Status
  • Priority
  • Source
  • Discipline
  • Location
  • Asset
  • Area Served

Tests

  • Status
  • Attempts
  • Discipline
  • Location
  • Asset
  • Area Served

Tasks

  • Status
  • Source


Equipment

  • Status
  • Discipline
  • Equipment Type
  • System
  • Location
  • Area Served

Reviews

  • Review Type
  • Review Remark

Equipment Types

  • Discipline

Spaces

  • Building

Zones

  • Building

Checklists

  • Status
  • Discipline
  • Checklist Type
  • Location
  • Asset
  • Area Served

Field Observations

  • Field Observation Type

Systems

  • Discipline
  • Building

Floors

  • Building


Batch Create Checklists and Tests in the Field

We are pleased to announce the latest release of the iOS app with a major new feature: batch creation of checklists and tests! This release also adds next/previous buttons for navigating between items in a list and a healthy dose of bug fixes.

Batch Create Checklists and Tests

In upgraded projects, tapping the “+” button above the checklist or test list will present a new batch create window. Just like the web, you’ll be able to select one or more assets, one or more templates, and then set options such as type and assignment before tapping “Create” to create the checklists or tests.

Easily create checklists and tests in the field with the new batch create

Batch creation is only available within upgraded projects, and only project templates are available currently. A future update will add account templates.

After you’ve created checklists or tests, why not try the recently added batch answer feature to efficiently answer them?

Next/Previous Buttons

You can now quickly step through your lists using our handy previous and next buttons. These are especially useful in the app’s full-screen mode.

New next and previous buttons allow navigation even when the list is hidden

Bug Fixes

This release also includes many bug fixes.

  • Fixed crashes that would sometimes occur when deleting items from a list.
  • Removed hard-coded stand-in numbers on the equipment list view.
  • Changing the sync interval no longer disables automatic syncing.
  • Window titles in App Exposé now properly reflect the window’s contents.
  • Using the app with Airplay Mirroring now responds properly.
  • Equipment list now properly sorts by status in the asset picker.
  • Fixed situation where some lists wouldn’t update their totals after deleting or adding new items.
  • Asset type switcher in the asset picker now scrolls smoothly.
  • Markups added to images using the iOS Markup are no longer removed when the image is added to the app.

We hope you enjoy these updates! As always, let us know how we can help you at support@cxalloy.com and let us know what other features we should be adding at feedback.cxalloy.com.

Webinar Series

We recently held the first of our new webinar series, Bringing Transparency and Effectiveness to the Whole Project Team. You can watch on demand right now at CxAlloy.com/media/20200211.

Join us for future webinars. Every month we will feature speakers from the commissioning and construction industry to share the ways they are using CxAlloy TQ to work faster and more effectively.

During the live event, we had a lot of great questions come in, but we didn’t have enough time to answer them all live. Afterwards, our speakers got together and wrote up answers to share below. If you have additional questions, contact us at support@cxalloy.com and we’ll be happy to help.

Continue reading “Webinar Series”

CxAlloy TQ February 2020 Release

We are pleased to announce the first CxAlloy TQ update of 2020! In this release we’ve made two important tools more useful: importing and the report generator. We’ve also added an export for project attributes and, of course, fixed some bugs.

Importing

New import options for issues include Issue Status, Assignment, and Asset.

We’ve made four key additions to the import capabilities of CxAlloy TQ. You can now:

  • Import issue and equipment status.
  • Import issue assignment and asset.
  • Import multiple systems for equipment and multiple zones for spaces.
  • Import areas served for equipment.

These are long-requested improvements that we are really excited to make available. They open up new flows for managing data in your project and reduce the amount of time it takes to set up large-scale projects with complex combinations of systems and locations.

These new import capabilities are available now, and we’ll provide a deeper dive into how they work in an upcoming blog post.

Report Generator

Many more options are available for each section in the Report Generator.

We have greatly expanded the filtering options available for each section. Each section (issues, checklists, tests, etc.) now includes all or most of the same filters as that section’s list view. For example, when adding the “Construction Issues” section, you can now filter by:

  • Status
  • Priority
  • Source
  • Discipline
  • Location
  • Asset
  • Area Served

Even better, you can select multiple options for each of these filters, just like you can on the list page.

These filters create new possibilities for the reports you create. For example, you can now create a final report for just one building in a multi-building project – just filter each section to that specific building. Or, create a system- or discipline-specific report. There are a lot of options – literally!

To accommodate all these new filters we’ve expanded the options window to a two-column view with sorting and filtering on the left and format options on the right.

We’ll outline all the new options and some ways to use them in an upcoming blog post.

Attributes Export and Bug Fixes

This release also adds an “Export” button to the attributes list in both project settings and account settings.

You can now export project and account attributes.

As always, let us know how we can help you at support@cxalloy.com and let us know what other features we should be adding at feedback.cxalloy.com.

CxAlloy TQ 4.0 for iOS

Newly released in the App Store is version 4.0 of the CxAlloy TQ iOS app, which features significant foundational changes to support exciting new functionality in iOS and iPadOS 13. Aside from dozens of small improvements and bug fixes, this update features three main tent-pole features.

Multiple Windows

A big new feature in iPadOS 13 is the ability for a single app to have multiple windows. Now, in 4.0, you can tap and drag projects, project sections, and list items into their own windows. Work on two different sections of the app or even completely different projects side by side!

Powerful List Views

Do more directly in the app’s list views with support for swipe actions, iOS 13 contextual menus, and batch actions with the new Select button. We’ll add additional actions to the list views in upcoming versions.

State Restoration

When returning to the app after switching away for a while, the app will make an effort to restore your location in the app, getting you back up and running quicker. We’re excited about these features today as well as the possibilities they unlock for the future. Have questions? Let us know at support@cxalloy.com.

Easier Renaming through Imports

Recently we released an update to imports that makes it easier to rename items using an imported Excel file. Although technically possible in the past, doing so was confusing, time-consuming, and prone to error. It’s now much simpler and easy to understand.

As equipment is the most common scenario for renaming, we'll be talking specifically about equipment for the remainder of this post. However all imports (issues, checklist and test lines, spaces, etc.) now work this way as well.

Now if you check the “Update existing equipment” checkbox when starting your import you will have an additional option, “Match”, that you select for one of the columns in your spreadsheet. This column is used to match up the rows in your spreadsheet with existing equipment in the project.

With the addition of the “Match” option you are now free to use the “Name” option to specify new names for the matched equipment. A simple spreadsheet for renaming equipment would look like this:

Match New Name
AHU-1 AHU-1A
AHU-2 AHU-2A
AHU-3 AHU-3A
AHU-4 AHU-4A

If you don’t have any new names as part of your import you simply don’t select “Name” for any of the columns of your spreadsheet.

As an added bonus, CxAlloy TQ will now automatically update the names of any related checklists and tests when you change the name of equipment.

In this post we’ve focused on equipment, but this same approach can be used to update issue descriptions, checklist and test line questions, and more. For all the details you can read our import support article.

Batch Answer – New for CxAlloy TQ iOS App

The latest addition to the iOS app is Batch Answer – a new interface for answering similar tests or checklists.

Many tests or checklists are created from the same template and thus have identical lines. With Batch Answer, you can quickly and easily answer these identical lines from a single screen. This includes:

  • Adding and changing an answer
  • Adding and editing a note
  • Adding an issue
  • Adding a photo

How to Batch Answer

To batch answer, first use the “Select” option to select each test (or checklist) you want to batch answer.

Next, tap the “Answer” button – this will show the Batch Answer screen. This screen closely resembles a single test, but in this case, each line can be expanded by tapping a drop-down indicator on the right.

With the line expanded, you can answer one or more tests.

To batch answer tests or checklists, each must meet the following requirements:

  1. Created after 9/24/2019
  2. Created from the same template
  3. Has not been structurally modified. This includes: no edits to line text, no lines added or removed, and no lines reordered.

You’ll know whether or not these three conditions pass because the “Answer” button will enable/disable.

We are excited to hear how you use Batch Answer to speed up your answering of tests and checklists!

File Markups and Callouts

One of the most transformative features we have been working on this past year is File Markups, letting you draw and place text on images and PDFs. We were excited to launch File Markups in beta at our User Conference and want to give you an overview of this upcoming feature.

Markup tools appear on the right side of the toolbar

File Markups build on the new file viewer we released this summer. With Markups you’ll see new tools for adding circles, rectangles, arrows, text, and freeform drawings when viewing images and PDFs. Tools default to the style commonly used in construction (red lines, cloudy borders) but extensive style options are available.

Each markup type has extensive style options available

We were careful to ensure that Markups work as you would expect: Each markup is treated like any other content, with associated permissions based on who created it, full syncing between iOS and the web, and integration into reports. For a detailed explanation of permissions please check out our support article.

Callouts

Rectangle and circle markups will create a Callout, which is an image of just that region of the photo or PDF.

The Callouts section lets you view rectangle and circle markups without having to open the files

Callouts provide several benefits: you don’t have to click to open a file to see the markups, they effectively “zoom in” on the area in question, and they can surface information from any page within a PDF.

A new “Callouts” area is shown on any page that already has “Files”, and a new “Callouts” option when creating PDFs is available.

Please note that arrows, text, and freeform drawings do not create accompanying callouts. We made that decision purposefully to provide a consistent and useful experience with callouts. You can read a full explanation behind that choice in our support article.

We think File Markups and Callouts will be really useful in lots of situations, from highlighting key paragraphs of a spec, to pointing out a specific riser in a photo, to drawing attention to electrical notes on a crowded drawing.

File Markups will be generally available before the end of the year. We hope you look forward to it!

Push Template Changes is Here!

We all know the story: you create 100 checklists based on a template, only to realize that you need to add one more line. Now you have to find the checklists, delete them, update the template, and create all 100 again.

But no more! With the new “Push Changes” feature, all you have to do is add the line to the template and click the “Push Changes” button. All 100 checklists will be updated with the line you just added. Go get another cup of coffee with all that time you just saved!

This has been our most-requested feature and we are thrilled to be able to deliver it.

You may be wondering, what if the checklists or tests are partially completed? Will it still work then? Yes! Answers, notes, attribute values, associated files and issues – all of those can be part of a checklist or test and it can still be updated via “Push Template Changes”.

There are a couple of prerequisites that determine which checklists and tests can be updated via “Push Template Changes”. First, the checklists or tests need to have been created from a project template. Second, they need to have been created after September 25, 2019. Finally, the checklists or tests can not have been structurally modified – i.e., if you edited a line’s question, added or deleted lines, or reordered lines then that particular checklist or test is excluded.

Don’t worry, you can review which checklists or tests will be updated and the updates that will be applied prior to pushing changes. You can also exclude specific checklists or tests by unchecking them prior to pushing changes. Read our support article for more details.

Earlier I noted that this was our most-requested feature. I can only say that because of the feature request forum we rolled out last year which has been a tremendous resource for us as we decide what features to prioritize. If you are a CxAlloy user, I encourage you to let us know what features you’d like to see at feedback.cxalloy.com.

Account-Level User Management – Customer Appreciation Summer

The next release in our customer appreciation summer is a real time-saver for those with large project portfolios. You can now select a user in the account area and add them to multiple projects simultaneously.

image

When adding users in this way you assign them a permission preset. This works well with custom permission presets, a feature we released during last year’s Customer Appreciation Summer. Synergy! 😀

And don’t worry, CxAlloy TQ only sends a single email to the user when you add them to multiple projects in this way. You can even choose not to notify them at all by unchecking that option at the bottom left of the window.

Access this feature by going to Account → People, then clicking “Add” in the Projects subsection.

Summer Extension

You may have noticed that our Customer Appreciation Summer had a hiatus these past few weeks. Rest assured that it continues and will extend a bit to make up for the time off. Here are a few of the features we are getting ready as you read this:

  • Ability to convert a person to a contact instead of deleting them from the account.
  • Ability to update statuses via an Excel import.
  • An improved flow for renaming equipment via an Excel import.

See you next time!

Go Dark on iOS

[et_pb_section][et_pb_row][et_pb_column type=”4_4″][et_pb_text]

Starting with version 3.15 of the iOS app a new dark appearance is available that lowers the lights on your CxAlloy TQ project. To enable the new dark appearance, enable the system-wide dark mode on your iOS device. System dark mode requires iOS 13. You can learn more about updating your device to iOS 13 on Apple’s website.

[/et_pb_text][/et_pb_column][/et_pb_row][/et_pb_section]

Multiple Photos in Field Observation Comments – Customer Appreciation Summer

If the number of requests on our feedback forum is to be believed, many of you are going to be happy with our latest release.

You can now upload as many photos to a field observation comment as you want. Woo-hoo! We’ve rolled this out both on the web and in version 3.14 of the iOS app.

image

Comment Reordering

Earlier this year we added comment reordering for field observation comments, but there was no obvious indicator that it was possible. In this update we’ve made it clearer that comments can be reordered with an always-visible drag handle. We’ve also made several other improvements to the reordering experience.

image

Dropping Support for iOS 10 and iOS 11

Also, in order to better support the upcoming iOS 13 and iPadOS 13, as well as some big features we have in the works, we will be dropping support for older versions of iOS. Version 3.14 will be the last major version of the app that supports iOS 10 and iOS 11. Devices running these older versions should update to iOS 12. iOS 12 is compatible with the devices listed on Apple’s site (note, any device that can run iOS 11 can run iOS 12). If you are using an older device that is not listed, you can continue running the app as it exists currently, it just will no longer receive updates past 3.14. If you have any questions or concerns, please contact support.

Task Comment Editing – Customer Appreciation Summer

I’ve got to be up front with you all – this week’s feature should have been there from the beginning. Being able to edit a comment you made is pretty important after all. What if you made a typo? Or you forgot to include something important? You could always delete it and re-add it with the needed changes, but let’s be real, you should just be able to edit it.

Well, now you can. Huzzah!

See you next week!